After you create a custom image, you can export its files to an Object Storage Service (OSS) bucket in the Elastic Compute Service (ECS) console and then download the files to your computer for analysis and backup. This topic describes how to export a custom image and the items to consider during export.
Prerequisites
OSS is activated. For more information, see Get started with OSS.
An OSS bucket is created in the same region as the custom image to be exported. For more information, see Create buckets.
The
AliyunECSImageExportDefaultRolerole is assigned to ECS for OSS access.
Considerations
Limits
Item | Description |
Image format and operating system | Due to image copyright restrictions, Windows Server custom images and custom images created based on Alibaba Cloud Marketplace images cannot be exported. |
Number and size of data disks | The size of a data disk cannot exceed 2 TiB. Note If a data disk is larger than 2 TiB, distribute the disk data across multiple disks smaller than 2 TiB, create a custom image based on the smaller disks, and then export the image. |
Encrypted images | Encrypted images cannot be exported.
|
Usage notes
Item | Description |
Export fee | Exported image files are stored in OSS buckets. You are charged OSS storage fees. If you download the files to your computer, you are also charged data transfer fees. For information about OSS billing, see Billing overview. |
Export duration | The time required to export a custom image varies based on the size of the image files and the number of concurrent export tasks in the queue. |
Exported image files | If an exported custom image contains data disk snapshots, multiple image files are generated and stored in the same OSS bucket. Note Files whose names contain system are system disk snapshots, while those with data are data disk snapshots. The identifiers of data disk snapshots are the mount points of the source data disks, such as xvdb and xvdc. |
Others |
|
Procedure
Go to ECS console - Images.
In the top navigation bar, select the region and resource group of the resource that you want to manage.

On the Custom Images tab, find the target image and click Export Image in the Actions column.
Read the precautions for exporting images in the Make Preparations step and click Next. Confirm that the prerequisites are met and click Continue.
Configure the parameters in the Export Image File step.
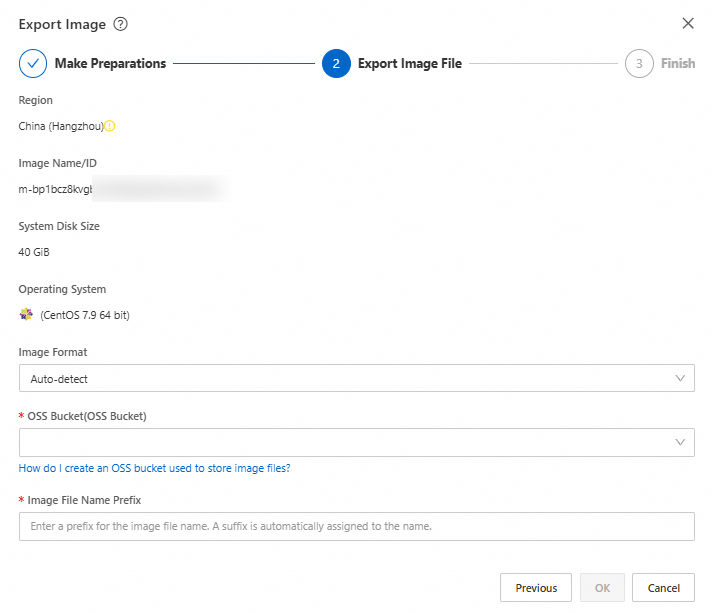
Image Format: Retain the default value Auto-detect or specify your preferred export format. Valid values: Auto-detect, RAW, VHD, QCOW2, VDI, and VMDK.
NoteThe Image Format parameter is available only in the following regions: India (Mumbai) Closed Down, Japan (Tokyo), Australia (Sydney), Indonesia (Jakarta), Germany (Frankfurt), UAE (Dubai), US (Virginia), UK (London), Singapore, Malaysia (Kuala Lumpur), and US (Silicon Valley).
In regions where the Image Format parameter is unavailable, images are automatically exported in the RAW format.
OSS Bucket: Select an OSS bucket in the same region as the custom image.
Image File Name Prefix: Specify a prefix for the OSS object names of exported image files.
For example, if you specify Demo, the name of each exported image file in the OSS bucket is in the following format: Demo-[Automatically generated object name].
Click OK.
The time required to export the custom image varies based on the size of the image files and the number of concurrent export tasks in the queue. You can view the task progress based on the task ID on the Tasks page in the ECS console, or log on to the OSS console to check the result.
Before the task is completed, you can cancel the task on the Tasks page.
What to do next
You can download the exported image files from the OSS bucket to your computer. For more information, see Simple download.
If you select RAW as the image format when exporting the custom image, the name extension of the exported image files is .raw.tar.gz, and that of the decompressed files is .raw. If your computer runs Mac OS X, use GNU Tar to decompress image files.
FAQ
What do I do if an image export task fails?
If a custom image fails to be exported, perform the following steps:
View the error code on the Tasks page or by calling the DescribeTaskAttribute operation.
Identify the cause and resolve the issue based on the error code.
Error code
Cause
Cause identification
Handling suggestion
IMAGE_ALREADY_EXIST
An image file (object) with the same name as the one you want to export exists in the OSS bucket.
Check whether an image file (object) with the same name as the one you want to export exists in the OSS bucket.
Export the image file to a different OSS bucket.
Specify a different name for the image file you want to export and try again.